









1 使用rsync+inotify实现/www目录实时同步
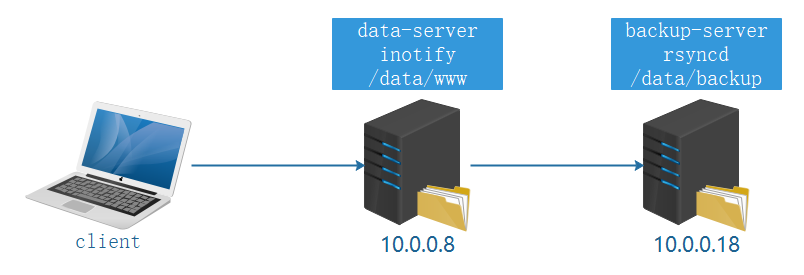
# 设置主机名
[root@centos8 ~]# hostnamectl set-hostname data-server
[root@centos8 ~]# exit

[root@centos8 ~]# hostnamectl set-hostname backup-server
[root@centos8 ~]# exit

# 准备目录
[root@data-server ~]# mkdir -pv /data/www
mkdir: created directory '/data/www'

[root@backup-server ~]# mkdir -pv /data/backup
mkdir: created directory '/data/backup'

# 安装软件包
[root@data-server ~]# yum install inotify-tools rsync -y

[root@backup-server ~]# dnf install rsync-daemon -y

# 修改rsync服务器的配置文件
[root@backup-server ~]# vim /etc/rsyncd.conf
uid = root  # 指定以哪个用户来访问共享目录,将之指定为生成的文件所有者,默认为nobody
gid = root  # 默认为nobody
#port = 874 可指定非标准端口,默认为873/tcp
#use chroot = no
max connections = 0
ignore errors
exclude = lost+found/
log file = /var/log/rsyncd.log
pid file = /var/run/rsync.pid
local file = /var/run/rsyncd.lock
reverse lookup = no
#hosts allow = 10.0.0.0/24
[backup]   # 每个模块名对应一个不同的path目录,如果同名后面模块生效
path = /data/backup
comment = backup dir
read only = no # 默认是yes,即只读
auth users = rsyncuser # 默认为anonymous可以访问rsync服务器
secrets file = /etc/rsync.pas

# 启动服务
[root@backup-server ~]# systemctl enable --now rsyncd
Created symlink /etc/systemd/system/multi-user.target.wants/rsyncd.service → /usr/lib/systemd/system/rsyncd.service.
[root@backup-server ~]#

# 生成验证文件
[root@backup-server ~]# echo "rsyncuser:waluna" > /etc/rsync.pas
[root@backup-server ~]# chmod 600 /etc/rsync.pas

# 客户端配置密码文件
# 也可以将密码赋值给环境变量RSYNC_PASSWORD变量,但不安全
# export RSYNC_PASSWORD=waluna
[root@data-server ~]# echo waluna > /etc/rsync.pas
[root@data-server ~]# chmod 600 /etc/rsync.pas

# 客户端测试同步数据
[root@data-server ~]# rsync -avz --delete --password-file=/etc/rsync.pas /data/www/ rsyncuser@10.0.0.18::backup
sending incremental file list
./

sent 50 bytes  received 19 bytes  138.00 bytes/sec
total size is 0  speedup is 0.00
[root@data-server ~]#

# 创建脚本
[root@data ~]# vim inotify_rsync.sh
#!/bin/bash
SRC='/data/www/'  # 注意最后的/
DEST='rsyncuser@10.0.0.18::backup'
rpm -q rsync &> /dev/null || yum install rsync -y
inotifywait -mrq --exclude=".*\.swp" --timefmt '%Y-%m-%d %H:%M:%S' --format '%T %w %f' -e create,delete,moved_to,close_write,attrib ${SRC} | while read DATE TIME DIR FILE;do
    FILEPATH=${DIR}${FILE}
    rsync -az --delete --password-file=/etc/rsync.pas $SRC $DEST && echo "At ${TIME} on ${DATE}, file $FILEPATH was backuped up via rsync" >> /var/log/changelist.log
done

# 执行脚本,默认前台执行,可用nohup后台执行
[root@data-server ~]# bash inotify_rsync.sh

[root@data-server ~]# nohup bash inotify_rsync.sh &> /dev/null &
[1] 1916
[root@data-server ~]# jobs
[1]+  Running                 nohup bash inotify_rsync.sh &> /dev/null &
[root@data-server ~]#

# 测试数据同步
[root@data-server ~]# touch /data/www/1.txt

[root@backup-server ~]# ls /data/backup/
1.txt

[root@data-server ~]# rm -f /data/www/1.txt

[root@backup-server ~]# ls /data/backup/

# 查看文件传输日志
[root@data-server ~]# rm -f /data/www/1.txt
[root@data-server ~]# cat /var/log/changelist.log
At 21:58:01 on 2021-09-27, file /data/www/1.txt was backuped up via rsync
At 21:58:01 on 2021-09-27, file /data/www/1.txt was backuped up via rsync
At 21:58:01 on 2021-09-27, file /data/www/1.txt was backuped up via rsync
At 21:58:43 on 2021-09-27, file /data/www/1.txt was backuped up via rsync
[root@data-server ~]#
2 使用iptable实现: 放行telnet, ftp, web服务,放行samba服务,其他端口服务全部拒绝
iptables -A INPUT -p tcp -m multiport --dports 20:23,53,80,139,443,445 -j ACCEPT
iptables -A INPUT -j REJECT
3 NAT原理总结
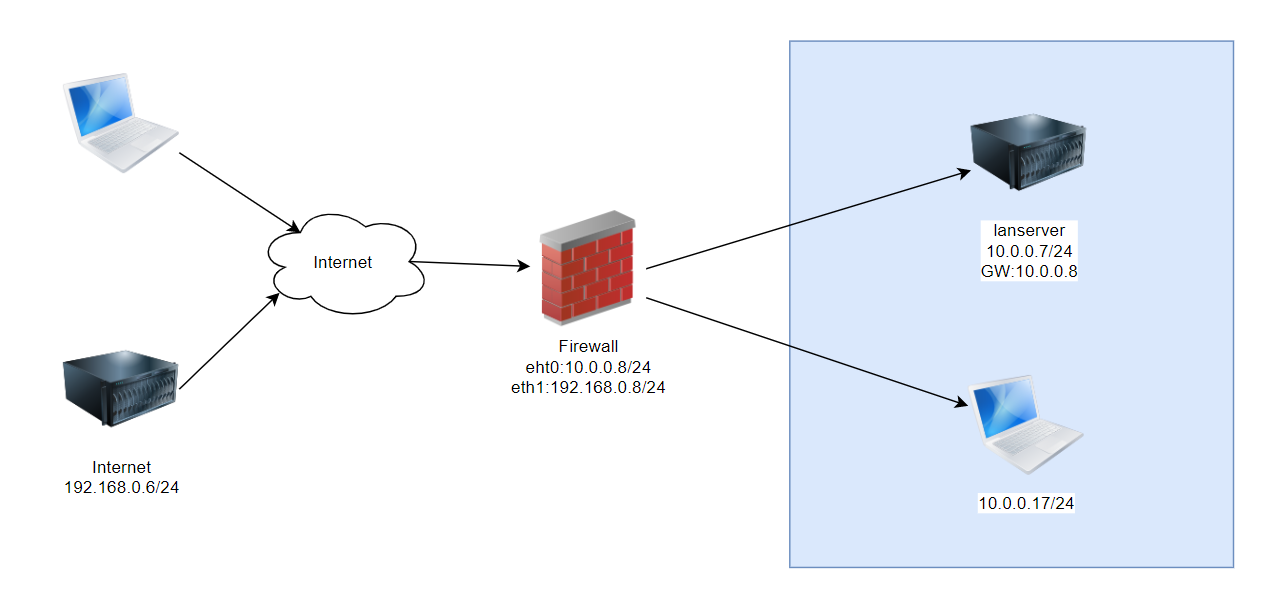
NAT:network address transation,支持PREROUTING,INPUT,OUTPUT,POSTROUTING四个链
请求报文:修改源/目标IP,由定义如何修改
响应报文:修改源/目标lP,根据跟踪机制自动实现
NAT的实现分为下面类型:
- SNAT:source NAT,支持POSTROUTING, INPUT,让本地网络中的主机通过某一特定地址访问外部网络,实现地址伪装,请求报文:修改源IP
- DNAT:destination NAT,支持PREROUTING, OUTPUT,把本地网络中的主机上的某服务开放给外部网络访问(发布服务和端口映射),但隐藏真实IP,请求报:修改目标lP
- PNAT:port nat,端口和IP都进行修改
4 iptables实现SNAT和DNAT,并对规则持久保存
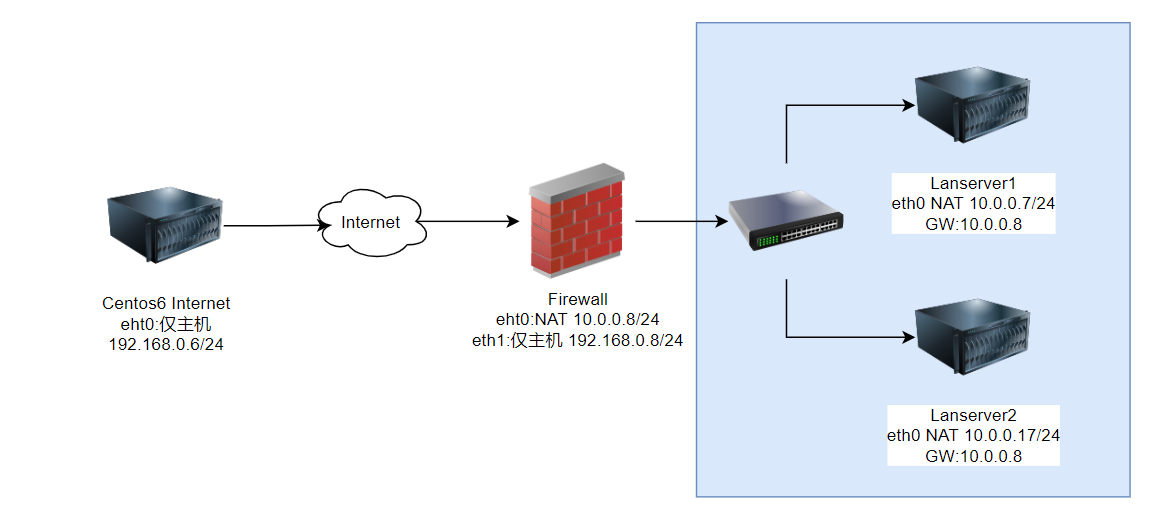
4.1 实现 SNAT
[root@Internet ~]# hostname -I
192.168.0.6
# 注意外网主机上是没有网关的
[root@Internet ~]# route -n
Kernel IP routing table
Destination     Gateway         Genmask         Flags Metric Ref    Use Iface
192.168.0.0     0.0.0.0         255.255.255.0   U     0      0        0 eth0
169.254.0.0     0.0.0.0         255.255.0.0     U     1002   0        0 eth0

# 启用路由转发
[root@Firewall ~]# vim /etc/sysctl.conf
net.ipv4.ip_forward=1
[root@Firewall ~]# sysctl -p
net.ipv4.ip_forward = 1
[root@Firewall ~]# sysctl -a | grep net.ipv4.ip_forward
net.ipv4.ip_forward = 1

[root@Lanserver1 ~]# hostname -I
10.0.0.7
[root@Lanserver1 ~]# route -n
Kernel IP routing table
Destination     Gateway         Genmask         Flags Metric Ref    Use Iface
0.0.0.0         10.0.0.8        0.0.0.0         UG    100    0        0 eth0
10.0.0.0        0.0.0.0         255.255.255.0   U     100    0        0 eth0

[root@Lanserver2 ~]# hostname -I
10.0.0.17
[root@Lanserver2 ~]# route -n
Kernel IP routing table
Destination     Gateway         Genmask         Flags Metric Ref    Use Iface
0.0.0.0         10.0.0.8        0.0.0.0         UG    100    0        0 eth0
10.0.0.0        0.0.0.0         255.255.255.0   U     100    0        0 eth0

# 添加策略前测试
[root@Firewall ~]# iptables -F -t nat

[root@Internet ~]# curl 10.0.0.7
curl: (7) Failed to connect to 10.0.0.7: Network is unreachable

[root@Lanserver1 ~]# curl 192.168.0.6
curl: (7) Failed connect to 192.168.0.6:80; Connection timed out
[root@Lanserver2 ~]# curl 192.168.0.6
curl: (7) Failed connect to 192.168.0.6:80; Connection timed out

# 添加防火墙策略 方法1
[root@Firewall ~]# iptables -t nat -A POSTROUTING -s 10.0.0.0/24 -j SNAT --to-source 192.168.0.8
[root@Firewall ~]# iptables -nvL -t nat
Chain PREROUTING (policy ACCEPT 0 packets, 0 bytes)
 pkts bytes target     prot opt in     out     source               destination

Chain INPUT (policy ACCEPT 0 packets, 0 bytes)
 pkts bytes target     prot opt in     out     source               destination

Chain POSTROUTING (policy ACCEPT 0 packets, 0 bytes)
 pkts bytes target     prot opt in     out     source               destination
    0     0 SNAT       all  --  *      *       10.0.0.0/24          0.0.0.0/0            to:192.168.0.8

Chain OUTPUT (policy ACCEPT 0 packets, 0 bytes)
 pkts bytes target     prot opt in     out     source               destination

# 再次测试
[root@Lanserver1 ~]# curl 192.168.0.6
Internet
[root@Lanserver2 ~]# curl 192.168.0.6
Internet

[root@Internet ~]# curl 10.0.0.7
curl: (7) Failed to connect to 10.0.0.7: Network is unreachable
[root@Internet ~]# tail /var/log/httpd/access_log
192.168.0.8 - - [16/Jun/2021:22:30:28 +0800] "GET / HTTP/1.1" 200 9 "-" "curl/7.29.0"

[root@Lanserver1 ~]# ping -c1 192.168.0.6
PING 192.168.0.6 (192.168.0.6) 56(84) bytes of data.
64 bytes from 192.168.0.6: icmp_seq=1 ttl=63 time=0.430 ms

--- 192.168.0.6 ping statistics ---
1 packets transmitted, 1 received, 0% packet loss, time 0ms
rtt min/avg/max/mdev = 0.430/0.430/0.430/0.000 ms

[root@Internet ~]# tcpdump -i eth0 -nn icmp
tcpdump: verbose output suppressed, use -v or -vv for full protocol decode
listening on eth0, link-type EN10MB (Ethernet), capture size 65535 bytes
22:32:14.598820 IP 192.168.0.8 > 192.168.0.6: ICMP echo request, id 2063, seq 1, length 64
22:32:14.598839 IP 192.168.0.6 > 192.168.0.8: ICMP echo reply, id 2063, seq 1, length 64

# 方法2
[root@Firewall ~]# iptables -t nat -R POSTROUTING 1 -s 10.0.0.0/24 -j MASQUERADE
[root@Firewall ~]# iptables -nvL -t nat
Chain PREROUTING (policy ACCEPT 0 packets, 0 bytes)
 pkts bytes target     prot opt in     out     source               destination

Chain INPUT (policy ACCEPT 0 packets, 0 bytes)
 pkts bytes target     prot opt in     out     source               destination

Chain POSTROUTING (policy ACCEPT 0 packets, 0 bytes)
 pkts bytes target     prot opt in     out     source               destination
    0     0 MASQUERADE  all  --  *      *       10.0.0.0/24          0.0.0.0/0

Chain OUTPUT (policy ACCEPT 0 packets, 0 bytes)
 pkts bytes target     prot opt in     out     source               destination

# 测试
[root@Lanserver1 ~]# curl 192.168.0.6
Internet
[root@Firewall ~]# cat /proc/net/nf_conntrack
ipv4     2 tcp      6 117 TIME_WAIT src=10.0.0.7 dst=192.168.0.6 sport=52114 dport=80 src=192.168.0.6 dst=192.168.0.8 sport=80 dport=52114 [ASSURED] mark=0 zone=0 use=2
[root@Internet ~]# curl 10.0.0.7
curl: (7) Failed to connect to 10.0.0.7: Network is unreachable
4.2 实现DNAT
# 启用路由转发
[root@Firewall ~]# vim /etc/sysctl.conf
net.ipv4.ip_forward=1
[root@Firewall ~]# sysctl -p

# 更改端口号
[root@Lanserver1 ~]# vim /etc/httpd/conf/httpd.conf
Listen 8080
[root@Lanserver1 ~]# systemctl restart httpd

# 添加防火墙策略
[root@Firewall ~]# iptables -F -t nat
[root@Firewall ~]# iptables -t nat -A PREROUTING -d 192.168.0.8 -p tcp --dport 80 -j DNAT --to-destination 10.0.0.7:8080
[root@Firewall ~]# iptables -nvL -t nat
Chain PREROUTING (policy ACCEPT 0 packets, 0 bytes)
 pkts bytes target     prot opt in     out     source               destination
    0     0 DNAT       tcp  --  *      *       0.0.0.0/0            192.168.0.8          tcp dpt:80 to:10.0.0.7:8080

Chain INPUT (policy ACCEPT 0 packets, 0 bytes)
 pkts bytes target     prot opt in     out     source               destination

Chain POSTROUTING (policy ACCEPT 0 packets, 0 bytes)
 pkts bytes target     prot opt in     out     source               destination

Chain OUTPUT (policy ACCEPT 0 packets, 0 bytes)
 pkts bytes target     prot opt in     out     source               destination

# 测试
[root@Internet ~]# curl 192.168.0.8
Lanserver1

[root@Lanserver1 ~]# tail /var/log/httpd/access_log
192.168.0.6 - - [16/Jun/2021:22:56:13 +0800] "GET / HTTP/1.1" 200 11 "-" "curl/7.19.7 (x86_64-redhat-linux-gnu) libcurl/7.19.7 NSS/3.27.1 zlib/1.2.3 libidn/1.18 libssh2/1.4.2"

[root@Firewall ~]# cat /proc/net/nf_conntrack
ipv4     2 tcp      6 57 TIME_WAIT src=192.168.0.6 dst=192.168.0.8 sport=42462 dport=80 src=10.0.0.7 dst=192.168.0.6 sport=8080 dport=42462 [ASSURED] mark=0 zone=0 use=2
4.3 iptables规则保存
[root@centos8 ~]# yum install iptables-services -y
[root@centos8 ~]# cp /etc/sysconfig/iptables{,.bak}

# 保存现在的规则到文件中方法1
[root@centos8 ~]# /usr/libexec/iptables/iptables.init save
iptables: Saving firewall rules to /etc/sysconfig/iptables:[  OK  ]

# 保存现在的规则到文件中方法2
[root@centos8 ~]# iptables-save > /etc/sysconfig/iptables

# 开机启动
[root@centos8 ~]# systemctl enable iptables.service
Created symlink /etc/systemd/system/multi-user.target.wants/iptables.service → /usr/lib/systemd/system/iptables.service.
[root@centos8 ~]# systemctl mask firewalld.service nftables.service
Created symlink /etc/systemd/system/firewalld.service → /dev/null.
Created symlink /etc/systemd/system/nftables.service → /dev/null.
5 LVS调度算法总结
ipvs scheduler:根据其调度时是否考虑各RS当前的负载状态
分为两种:静态方法和动态方法
5.1 静态方法
仅根据算法本身进行调度
- RR:roundrobin,轮询,较常用
- WRR:Weighted RR,加权轮询,较常用
- SH:Source Hashing,实现session sticky,源IP地址hash;将来自于同一个IP地址的请求始终发往第一次挑中的RS,从而实现会话绑定
- DH:Destination Hashing;目标地址哈希,第一次轮询调度至RS,后续将发往同一个目标地址的请求始终转发至第一次挑中的RS,典型使用场景是正向代理缓存场景中的负载均衡,如:Web缓存
5.2 动态方法
主要根据每台RS当前的负载状态及调度算法进行调度Overhead=value较小的RS将被调度
1、LC:least connections适用于长连接应用
Overhead=activeconns*256+inactiveconns2、WLC:Weighted LC,默认调度方法,较常用
Overhead=(activeconns*256+inactiveconns)/weight3、SED:Shortest Expection Delay,初始连接高权重优先,只检查活动连接,而不考虑非活动连接
Overhead=(activeconns+1)*256/weight4、NQ:Never Queue,第一轮均匀分配,后续SED
5、LBLC:Locality-Based LC,动态的DH算法,使用场景:根据负载状态实现正向代理,实现WebCache等
6、LBLCR:LBLC with Replication,带复制功能的LBLC,解决LBLC负载不均衡问题,从负载重的复制到负载轻的RS,实现Web Cache等
5.3 内核版本4.15版本后新增调度算法:FO和OVF
FO(Weighted Fail Over)调度算法,在此FO算法中,遍历虚拟服务所关联的真实服务器链表,找到还未过载(未设置IP_VS_DEST_F_OVERLOAD标志)的且权重最高的真实服务器,进行调度
OVF(Overflow-connection)调度算法,基于真实服务器的活动连接数量和权重值实现。将新连接调度到权重值最高的真实服务器,直到其活动连接数量超过权重值,之后调度到下一个权重值最高的真实服务器,在此OVF算法中,遍历虚拟服务相关联的真实服务器链表,找到权重值最高的可用真实服务器。—个可用的真实服务器需要同时满足以下条件:
- 未过载(未设置IP_VS_DEST_F_OVERLOAD标志)
- 真实服务器当前的活动连接数量小于其权重值
- 其权重值不为零
Comments | 2 条评论
排版的时候,最好分一下步骤,一个步骤放在一个代码块中。这样看起来更清晰明了。
总体上做的非常棒!继续加油!
@brick 好?