









1 LVS的DR模式的简单介绍
官方文档地址:
http://www.linuxvirtualserver.org/VS-DRouting.html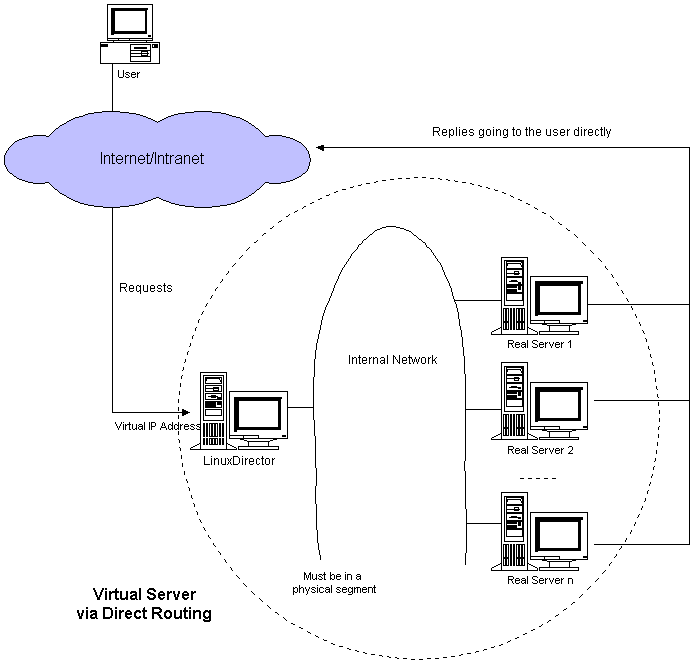
LVS-DR:Direct Routing,直接路由,LVS默认模式,应用最广泛,通过为请求报文重新封装一个MAC首部进行转发,源MAC是DIP所在的接口的MAC,目标MAC是某挑选出的RS的RIP所在接口的MAC地址;源IP/PORT,以及目标IP/PORT均保持不变
2 LVS的跨网络DR实现
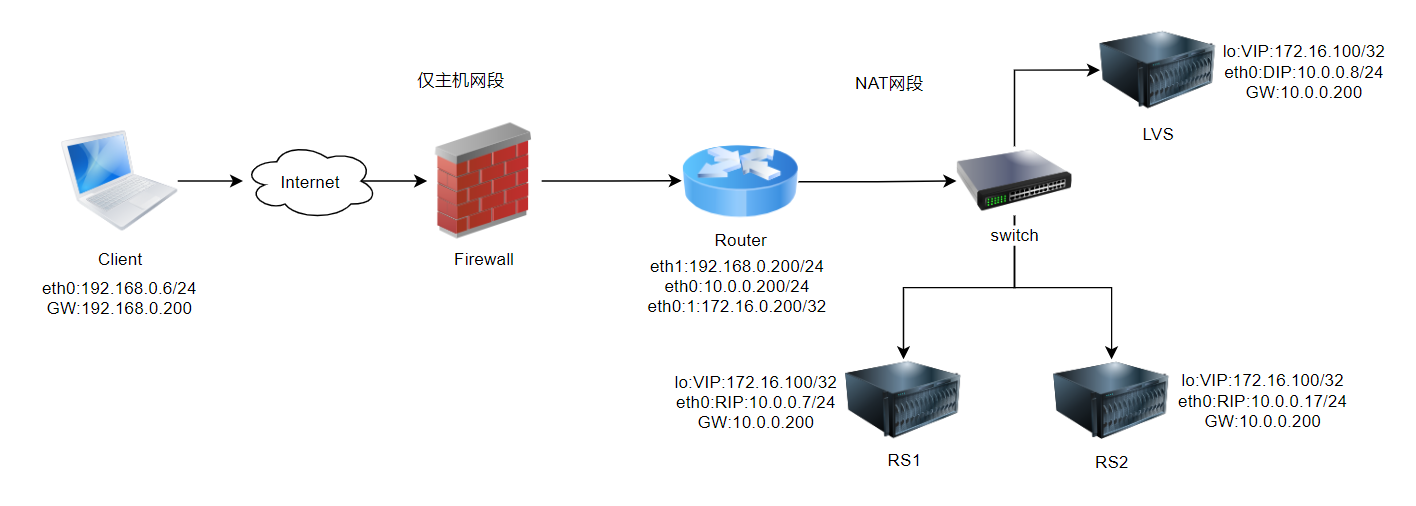
| 主机名 | IP | 系统 | 作用 |
|---|---|---|---|
| Client.waluna.top | eth0:仅主机模式:192.168.0.6/24 GW:192.168.0.200 |
centos 6.10 | 客户端 |
| Router.waluna.top | eth0:NAT模式:10.0.0.200/24 eth0:1:172.16.0.200/32 eth1:仅主机模式:192.168.0.200/24 启用ip_forward |
centos 8.3.2011 | 路由器 |
| LVS.waluna.top | lo:VIP:172.16.0.100/32 eht0:NAT模式:DIP:10.0.0.8/24 GW:10.0.0.200 |
centos 8.3.2011 | LVS服务器 |
| RS1.waluna.top | lo:VIP:172.16.0.100/32 eht0:NAT模式:RIP:10.0.0.7/24 GW:10.0.0.200 |
centos 7.9.2009 | RS服务器 |
| RS2.waluna.top | lo:VIP:172.16.0.100/32 eht0:NAT模式:DIP:10.0.0.17/24 GW:10.0.0.200 |
centos 7.9.2009 | RS服务器 |
所有主机都禁用 iptables 和 selinux
以下实验模拟外网用VM的仅主机模式(VMnet1),内网用VM的NAT模式(VMnet8)
2.1 环境准备
2.1.1 Client主机环境
# 修改主机名
[root@centos6 ~]# hostname Client.waluna.top
[root@centos6 ~]# exit

[root@Client ~]# hostname
Client.waluna.top

# 配置网卡
[root@Client ~]# vim /etc/sysconfig/network-scripts/ifcfg-eth0
[root@Client ~]# cat /etc/sysconfig/network-scripts/ifcfg-eth0
TYPE=Ethernet
NAME=eth0
DEVICE=eth0
ONBOOT=yes
BOOTPROTO=ststic
IPADDR=192.168.0.6
PREFIX=24
GATEWAY=192.168.0.200
[root@Client ~]# service network restart

# 查看IP和路由信息
[root@Client ~]# hostname  -I
192.168.0.6
[root@Client ~]# route -n
Kernel IP routing table
Destination     Gateway         Genmask         Flags Metric Ref    Use Iface
192.168.0.0     0.0.0.0         255.255.255.0   U     0      0        0 eth0
169.254.0.0     0.0.0.0         255.255.0.0     U     1002   0        0 eth0
0.0.0.0         192.168.0.200   0.0.0.0         UG    0      0        0 eth0
[root@Client ~]# ip a
1: lo: <LOOPBACK,UP,LOWER_UP> mtu 65536 qdisc noqueue state UNKNOWN
    link/loopback 00:00:00:00:00:00 brd 00:00:00:00:00:00
    inet 127.0.0.1/8 scope host lo
    inet6 ::1/128 scope host
       valid_lft forever preferred_lft forever
2: eth0: <BROADCAST,MULTICAST,UP,LOWER_UP> mtu 1500 qdisc pfifo_fast state UP qlen 1000
    link/ether 00:0c:29:0d:dc:1c brd ff:ff:ff:ff:ff:ff
    inet 192.168.0.6/24 brd 192.168.0.255 scope global eth0
    inet6 fe80::20c:29ff:fe0d:dc1c/64 scope link
       valid_lft forever preferred_lft forever
[root@Client ~]#
2.1.2 Router的网络配置
# 修改主机名
[root@centos8 ~]# hostnamectl set-hostname Router.waluna.top
[root@centos8 ~]# exit

[root@Router ~]# hostname
Router.waluna.top

# 修改内核参数,开启ip_forward转发功能
[root@Router ~]# echo net.ipv4.ip_forward = 1 >> /etc/sysctl.conf
[root@Router ~]# sysctl -p
net.ipv4.ip_forward = 1

# 配置网卡
[root@Router ~]# vim /etc/sysconfig/network-scripts/ifcfg-eth0
[root@Router ~]# cat /etc/sysconfig/network-scripts/ifcfg-eth0
TYPE=Ethernet
NAME=eth0
DEVICE=eth0
BOOTPROTO=static
ONBOOT=yes
IPADDR=10.0.0.200
PREFIX=24
IPADDR1=172.16.0.200
PREFIX1=24
[root@Router ~]# vim /etc/sysconfig/network-scripts/ifcfg-eth1
[root@Router ~]# cat /etc/sysconfig/network-scripts/ifcfg-eth1
TYPE=Ethernet
NAME=eth1
DEVICE=eth1
BOOTPROTO=static
ONBOOT=yes
IPADDR=192.168.0.200
PREFIX=24
[root@Router ~]# nmcli connection reload
[root@Router ~]# nmcli connection up eth0
Connection successfully activated (D-Bus active path: /org/freedesktop/NetworkManager/ActiveConnection/4)
[root@Router ~]# nmcli connection up eth1
Connection successfully activated (D-Bus active path: /org/freedesktop/NetworkManager/ActiveConnection/5)
[root@Router ~]#

# 查看IP和路由信息
[root@Router ~]# hostname -I
10.0.0.200 172.16.0.200 192.168.0.200
[root@Router ~]# route -n
Kernel IP routing table
Destination     Gateway         Genmask         Flags Metric Ref    Use Iface
10.0.0.0        0.0.0.0         255.255.255.0   U     101    0        0 eth0
172.16.0.0      0.0.0.0         255.255.255.0   U     101    0        0 eth0
192.168.0.0     0.0.0.0         255.255.255.0   U     102    0        0 eth1
[root@Router ~]# ip a
1: lo: <LOOPBACK,UP,LOWER_UP> mtu 65536 qdisc noqueue state UNKNOWN group default qlen 1000
    link/loopback 00:00:00:00:00:00 brd 00:00:00:00:00:00
    inet 127.0.0.1/8 scope host lo
       valid_lft forever preferred_lft forever
    inet6 ::1/128 scope host
       valid_lft forever preferred_lft forever
2: eth0: <BROADCAST,MULTICAST,UP,LOWER_UP> mtu 1500 qdisc fq_codel state UP group default qlen 1000
    link/ether 00:0c:29:91:72:d3 brd ff:ff:ff:ff:ff:ff
    inet 10.0.0.200/24 brd 10.0.0.255 scope global noprefixroute eth0
       valid_lft forever preferred_lft forever
    inet 172.16.0.200/24 brd 172.16.0.255 scope global noprefixroute eth0
       valid_lft forever preferred_lft forever
3: eth1: <BROADCAST,MULTICAST,UP,LOWER_UP> mtu 1500 qdisc fq_codel state UP group default qlen 1000
    link/ether 00:0c:29:91:72:dd brd ff:ff:ff:ff:ff:ff
    inet 192.168.0.200/24 brd 192.168.0.255 scope global noprefixroute eth1
       valid_lft forever preferred_lft forever
    inet6 fe80::20c:29ff:fe91:72dd/64 scope link
       valid_lft forever preferred_lft forever
[root@Router ~]#
2.1.3 LVS的网络配置
# 修改主机名
[root@centos8 ~]# hostnamectl set-hostname LVS.waluna.top
[root@centos8 ~]# exit

[root@LVS ~]# hostname
LVS.waluna.top

# 配置网卡
[root@LVS ~]# vim /etc/sysconfig/network-scripts/ifcfg-eth0
[root@LVS ~]# cat /etc/sysconfig/network-scripts/ifcfg-eth0
TYPE=Ethernet
NAME=eth0
DEVICE=eth0
BOOTPROTO=static
ONBOOT=yes
IPADDR=10.0.0.8
PREFIX=24
GATEWAY=10.0.0.200
[root@LVS ~]# nmcli connection reload
[root@LVS ~]# nmcli connection up eth0
Connection successfully activated (D-Bus active path: /org/freedesktop/NetworkManager/ActiveConnection/3)
[root@LVS ~]#

# 查看IP和路由信息
[root@LVS ~]# hostname -I
10.0.0.8
[root@LVS ~]# route -n
Kernel IP routing table
Destination     Gateway         Genmask         Flags Metric Ref    Use Iface
0.0.0.0         10.0.0.200      0.0.0.0         UG    100    0        0 eth0
10.0.0.0        0.0.0.0         255.255.255.0   U     100    0        0 eth0
[root@LVS ~]# ip a
1: lo: <LOOPBACK,UP,LOWER_UP> mtu 65536 qdisc noqueue state UNKNOWN group default qlen 1000
    link/loopback 00:00:00:00:00:00 brd 00:00:00:00:00:00
    inet 127.0.0.1/8 scope host lo
       valid_lft forever preferred_lft forever
    inet6 ::1/128 scope host
       valid_lft forever preferred_lft forever
2: eth0: <BROADCAST,MULTICAST,UP,LOWER_UP> mtu 1500 qdisc fq_codel state UP group default qlen 1000
    link/ether 00:0c:29:19:bf:73 brd ff:ff:ff:ff:ff:ff
    inet 10.0.0.8/24 brd 10.0.0.255 scope global noprefixroute eth0
       valid_lft forever preferred_lft forever
    inet6 fe80::20c:29ff:fe19:bf73/64 scope link
       valid_lft forever preferred_lft forever
[root@LVS ~]#
2.1.4 RS1的网络配置
# 修改主机名
[root@centos7 ~]# hostnamectl set-hostname RS1.waluna.top
[root@centos7 ~]# exit

[root@rs1 ~]# hostname
rs1.waluna.top

# 配置网卡
[root@rs1 ~]# vim /etc/sysconfig/network-scripts/ifcfg-eth0
[root@rs1 ~]# cat /etc/sysconfig/network-scripts/ifcfg-eth0
TYPE=Ethernet
NAME=eth0
DEVICE=eth0
BOOTPROTO=static
ONBOOT=yes
IPADDR=10.0.0.7
PREFIX=24
GATEWAY=10.0.0.200
[root@rs1 ~]# nmcli connection reload
[root@rs1 ~]# nmcli connection up eth0
Connection successfully activated (D-Bus active path: /org/freedesktop/NetworkManager/ActiveConnection/2)
[root@rs1 ~]#

# 查看IP和路由信息
[root@rs1 ~]# hostname -I
10.0.0.7
[root@rs1 ~]# route -n
Kernel IP routing table
Destination     Gateway         Genmask         Flags Metric Ref    Use Iface
0.0.0.0         10.0.0.200      0.0.0.0         UG    100    0        0 eth0
10.0.0.0        0.0.0.0         255.255.255.0   U     100    0        0 eth0
[root@rs1 ~]# ip a
1: lo: <LOOPBACK,UP,LOWER_UP> mtu 65536 qdisc noqueue state UNKNOWN group default qlen 1000
    link/loopback 00:00:00:00:00:00 brd 00:00:00:00:00:00
    inet 127.0.0.1/8 scope host lo
       valid_lft forever preferred_lft forever
    inet6 ::1/128 scope host
       valid_lft forever preferred_lft forever
2: eth0: <BROADCAST,MULTICAST,UP,LOWER_UP> mtu 1500 qdisc pfifo_fast state UP group default qlen 1000
    link/ether 00:0c:29:dc:0a:2b brd ff:ff:ff:ff:ff:ff
    inet 10.0.0.7/24 brd 10.0.0.255 scope global noprefixroute eth0
       valid_lft forever preferred_lft forever
    inet6 fe80::20c:29ff:fedc:a2b/64 scope link
       valid_lft forever preferred_lft forever
[root@rs1 ~]#

# 搭建web服务
[root@rs1 ~]# yum install httpd -y;systemctl enable --now httpd;hostname -I > /var/www/html/index.html
[root@rs1 ~]# curl 10.0.0.7
10.0.0.7
[root@rs1 ~]#
2.1.5 RS2的网络配置
# 修改主机名
[root@centos7 ~]# hostnamectl set-hostname RS2.waluna.top
[root@centos7 ~]# exit

[root@rs2 ~]# hostname
rs2.waluna.top

# 配置网卡
[root@rs2 ~]# vim /etc/sysconfig/network-scripts/ifcfg-eth0
[root@rs2 ~]# cat /etc/sysconfig/network-scripts/ifcfg-eth0
TYPE=Ethernet
NAME=eth0
DEVICE=eth0
BOOTPROTO=static
ONBOOT=yes
IPADDR=10.0.0.17
PREFIX=24
GATEWAY=10.0.0.200
[root@rs2 ~]# nmcli connection reload
[root@rs2 ~]# nmcli connection up eth0
Connection successfully activated (D-Bus active path: /org/freedesktop/NetworkManager/ActiveConnection/2)
[root@rs2 ~]#

# 查看IP和路由信息
[root@rs2 ~]# hostname -I
10.0.0.17
[root@rs2 ~]# route -n
Kernel IP routing table
Destination     Gateway         Genmask         Flags Metric Ref    Use Iface
0.0.0.0         10.0.0.200      0.0.0.0         UG    100    0        0 eth0
10.0.0.0        0.0.0.0         255.255.255.0   U     100    0        0 eth0
[root@rs2 ~]# ip a
1: lo: <LOOPBACK,UP,LOWER_UP> mtu 65536 qdisc noqueue state UNKNOWN group default qlen 1000
    link/loopback 00:00:00:00:00:00 brd 00:00:00:00:00:00
    inet 127.0.0.1/8 scope host lo
       valid_lft forever preferred_lft forever
    inet6 ::1/128 scope host
       valid_lft forever preferred_lft forever
2: eth0: <BROADCAST,MULTICAST,UP,LOWER_UP> mtu 1500 qdisc pfifo_fast state UP group default qlen 1000
    link/ether 00:0c:29:88:8f:74 brd ff:ff:ff:ff:ff:ff
    inet 10.0.0.17/24 brd 10.0.0.255 scope global noprefixroute eth0
       valid_lft forever preferred_lft forever
[root@rs2 ~]#

# 搭建web服务
[root@rs2 ~]# yum install httpd -y;systemctl enable --now httpd;hostname -I > /var/www/html/index.html
[root@rs2 ~]# curl 10.0.0.17
10.0.0.17
[root@rs2 ~]#
2.1.6 测试访问
# 客户端测试
[root@Client ~]# hostname -I
192.168.0.6
[root@Client ~]# ping -c1 10.0.0.7
PING 10.0.0.7 (10.0.0.7) 56(84) bytes of data.
64 bytes from 10.0.0.7: icmp_seq=1 ttl=63 time=0.774 ms

--- 10.0.0.7 ping statistics ---
1 packets transmitted, 1 received, 0% packet loss, time 0ms
rtt min/avg/max/mdev = 0.774/0.774/0.774/0.000 ms
[root@Client ~]# ping -c1 10.0.0.17
PING 10.0.0.17 (10.0.0.17) 56(84) bytes of data.
64 bytes from 10.0.0.17: icmp_seq=1 ttl=63 time=0.584 ms

--- 10.0.0.17 ping statistics ---
1 packets transmitted, 1 received, 0% packet loss, time 0ms
rtt min/avg/max/mdev = 0.584/0.584/0.584/0.000 ms
[root@Client ~]#

# LVS测试
[root@LVS ~]# hostname -I
10.0.0.8
[root@LVS ~]# ping -c1 192.168.0.6
PING 192.168.0.6 (192.168.0.6) 56(84) bytes of data.
64 bytes from 192.168.0.6: icmp_seq=1 ttl=63 time=0.778 ms

--- 192.168.0.6 ping statistics ---
1 packets transmitted, 1 received, 0% packet loss, time 0ms
rtt min/avg/max/mdev = 0.778/0.778/0.778/0.000 ms
[root@LVS ~]#

# 后端服务器测试
[root@rs1 ~]# hostname -I
10.0.0.7
[root@rs1 ~]# ping -c1 192.168.0.6
PING 192.168.0.6 (192.168.0.6) 56(84) bytes of data.
64 bytes from 192.168.0.6: icmp_seq=1 ttl=63 time=0.369 ms

--- 192.168.0.6 ping statistics ---
1 packets transmitted, 1 received, 0% packet loss, time 0ms
rtt min/avg/max/mdev = 0.369/0.369/0.369/0.000 ms
[root@rs1 ~]#

[root@rs2 ~]# hostname -I
10.0.0.17
[root@rs2 ~]# ping -c1 192.168.0.6
PING 192.168.0.6 (192.168.0.6) 56(84) bytes of data.
64 bytes from 192.168.0.6: icmp_seq=1 ttl=63 time=0.453 ms

--- 192.168.0.6 ping statistics ---
1 packets transmitted, 1 received, 0% packet loss, time 0ms
rtt min/avg/max/mdev = 0.453/0.453/0.453/0.000 ms
[root@rs2 ~]#
2.2 配置各主机
2.2.1 在LVS主机上运行脚本
# 准备脚本
[root@LVS ~]# vim lvs_dr_vs.sh
[root@LVS ~]# cat lvs_dr_vs.sh
#!/bin/bash
vip='172.16.0.100'
iface='lo:1'
mask='255.255.255.255'
port='80'
rs1='10.0.0.7'
rs2='10.0.0.17'
scheduler='wrr'
type='-g'
rpm -q ipvsadm &> /dev/null || yum install ipvsadm -y &> /dev/null
case $1 in
start)
    ifconfig $iface $vip netmask $mask # broadcast $vip up
    iptables -F
    ipvsadm -C
    ipvsadm -A -t ${vip}:${port} -s $scheduler
    ipvsadm -a -t ${vip}:${port} -r ${rs1} $type -w 1
    ipvsadm -a -t ${vip}:${port} -r ${rs2} $type -w 1
    echo "The VS Server is Ready!"
;;
stop)
    ipvsadm -C
    ifconfig $iface down
    echo "The VS Server is Canceled!"
    ;;
*)
    echo "Usage: $(basename $0) start|stop"
    exit 1
    ;;
esac
[root@LVS ~]#

# 运行脚本
[root@LVS ~]# bash lvs_dr_vs.sh start
The VS Server is Ready!
[root@LVS ~]# ipvsadm -Ln
IP Virtual Server version 1.2.1 (size=4096)
Prot LocalAddress:Port Scheduler Flags
  -> RemoteAddress:Port           Forward Weight ActiveConn InActConn
TCP  172.16.0.100:80 wrr
  -> 10.0.0.7:80                  Route   1      0          0
  -> 10.0.0.17:80                 Route   1      0          0
[root@LVS ~]#
2.2.2 在RS后端服务器运行脚本
# 准备脚本
[root@rs1 ~]# vim lvs_dr_rs.sh
[root@rs1 ~]# cat lvs_dr_rs.sh
#!/bin/bash
vip=172.16.0.100
mask='255.255.255.255'
dev=lo:1
rpm -q httpd &> /dev/null || yum install httpd -y &> /dev/null
systemctl enable -now httpd &> /dev/null && echo "The httpd Server is Ready!"
echo "`hostname -I`" > /var/www/html/index.html

case $1 in
start)
    echo 1 > /proc/sys/net/ipv4/conf/all/arp_ignore
    echo 1 > /proc/sys/net/ipv4/conf/lo/arp_ignore
    echo 2 > /proc/sys/net/ipv4/conf/all/arp_announce
    echo 2 > /proc/sys/net/ipv4/conf/lo/arp_announce
    ifconfig $dev $vip netmask $mask # broadcast $vip up
    echo "The RS Server is Ready!"
;;
stop)
    ifconfig $dev down
    echo 0 > /proc/sys/net/ipv4/conf/all/arp_ignore
    echo 0 > /proc/sys/net/ipv4/conf/lo/arp_ignore
    echo 0 > /proc/sys/net/ipv4/conf/all/arp_announce
    echo 0 > /proc/sys/net/ipv4/conf/lo/arp_announce
    echo "The RS Server is Canceled!"
;;
*)
    echo "Usage: $(basename $0) start|stop"
    exit 1
    ;;
esac
[root@rs1 ~]#

# 运行脚本
[root@rs1 ~]# bash lvs_dr_rs.sh start
The RS Server is Ready!

# 在RS后端服务器运行脚本和RS1一样
# 将脚本拷贝到RS2机器上
[root@rs1 ~]# scp lvs_dr_rs.sh 10.0.0.17:
The authenticity of host '10.0.0.17 (10.0.0.17)' can't be established.
ECDSA key fingerprint is SHA256:BvEOFVidIWSNe478SZ34jegCVOHesBaPh7bWvtccBkU.
ECDSA key fingerprint is MD5:ae:39:15:a0:72:e9:23:fd:02:0f:18:4b:b2:19:29:32.
Are you sure you want to continue connecting (yes/no)? yes
Warning: Permanently added '10.0.0.17' (ECDSA) to the list of known hosts.
root@10.0.0.17's password:
lvs_dr_rs.sh                                          100%  926     1.0MB/s   00:00
[root@rs1 ~]#

# 运行脚本
[root@rs2 ~]# bash lvs_dr_rs.sh start
The RS Server is Ready!
2.3 测试访问
[root@Client ~]# curl 172.16.0.100
10.0.0.17
[root@Client ~]# curl 172.16.0.100
10.0.0.7
[root@Client ~]#

# 查看访问日志
[root@rs1 ~]# tail -1 /var/log/httpd/access_log
192.168.0.6 - - [03/Oct/2021:22:16:11 +0800] "GET / HTTP/1.1" 200 10 "-" "curl/7.19.7 (x86_64-redhat-linux-gnu) libcurl/7.19.7 NSS/3.27.1 zlib/1.2.3 libidn/1.18 libssh2/1.4.2"
[root@rs1 ~]#
2.4 利用 Wireshark 抓包工具分析
2.4.1 分析三次握手过程
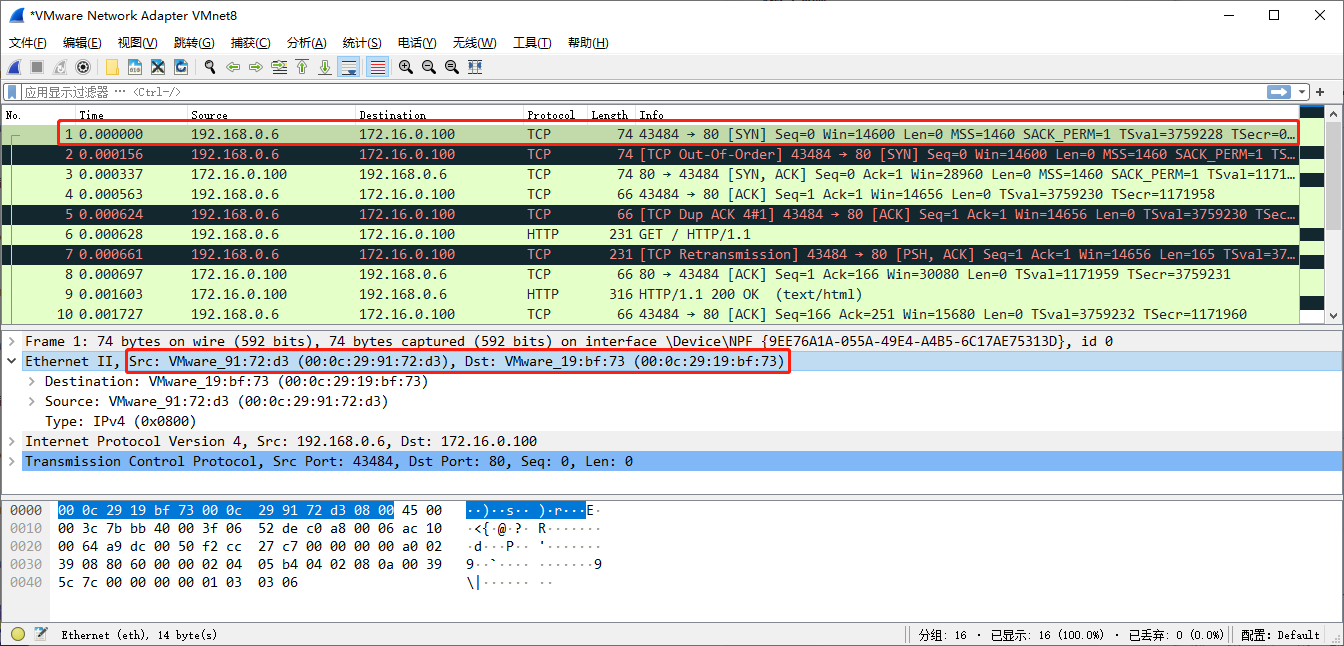
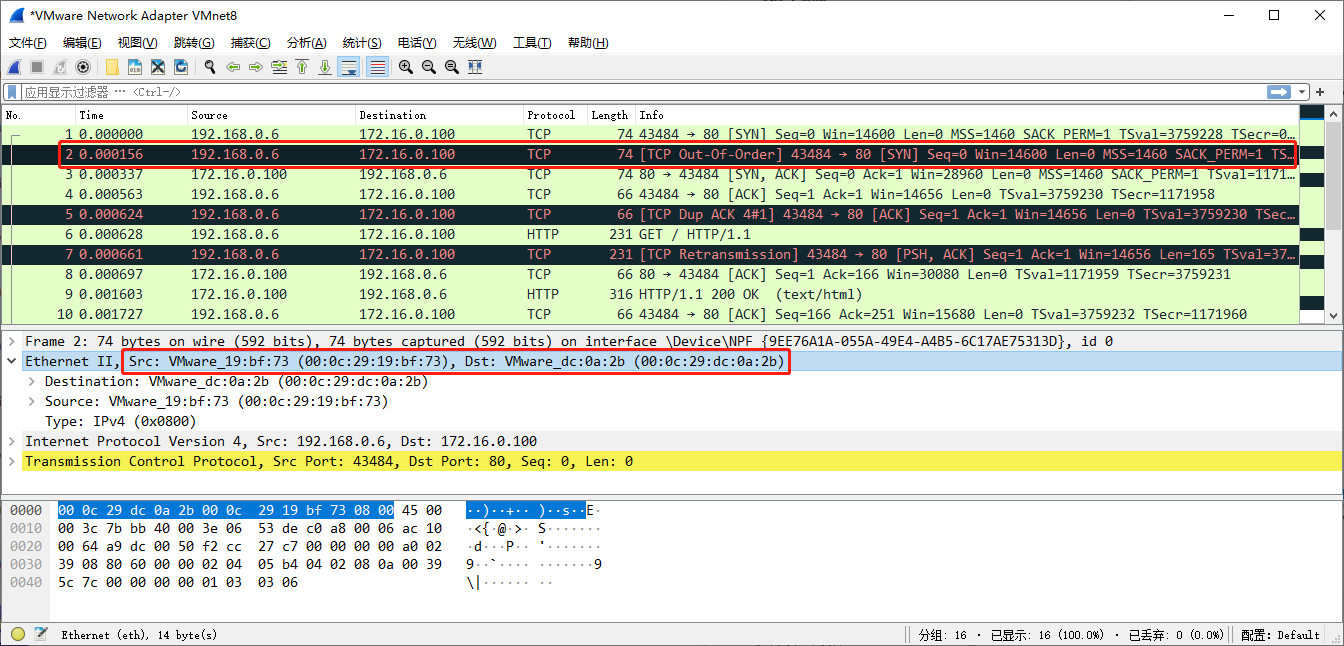
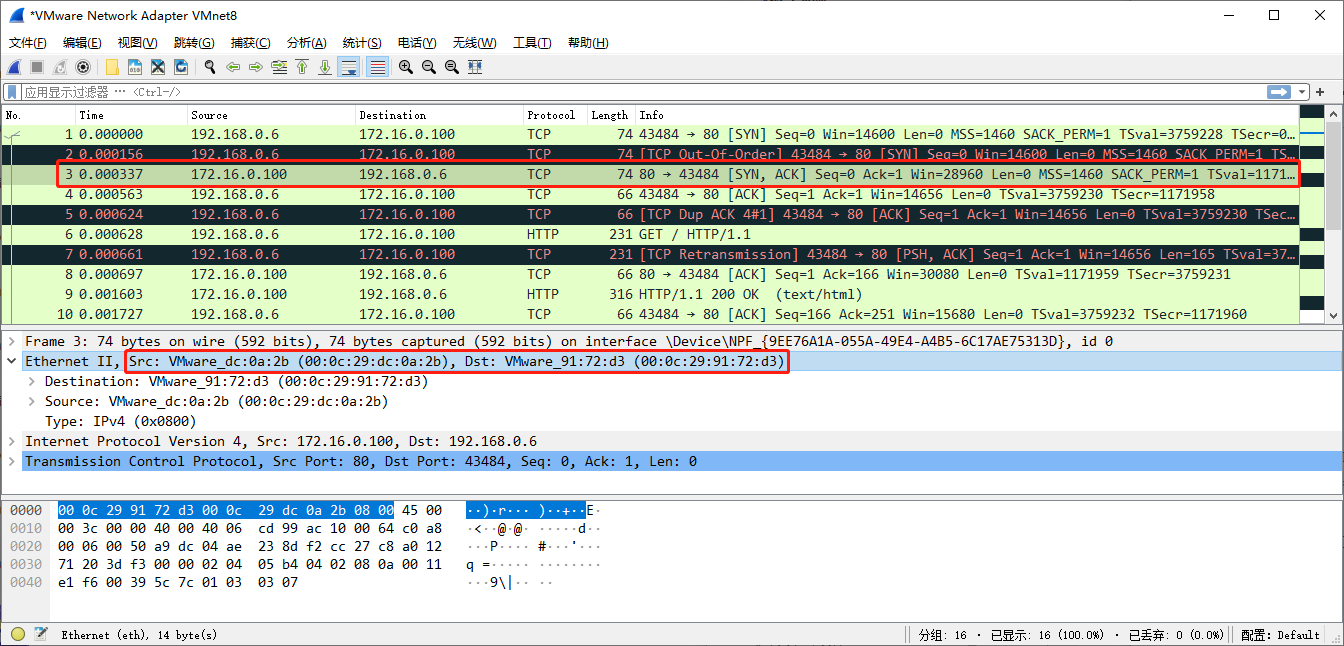
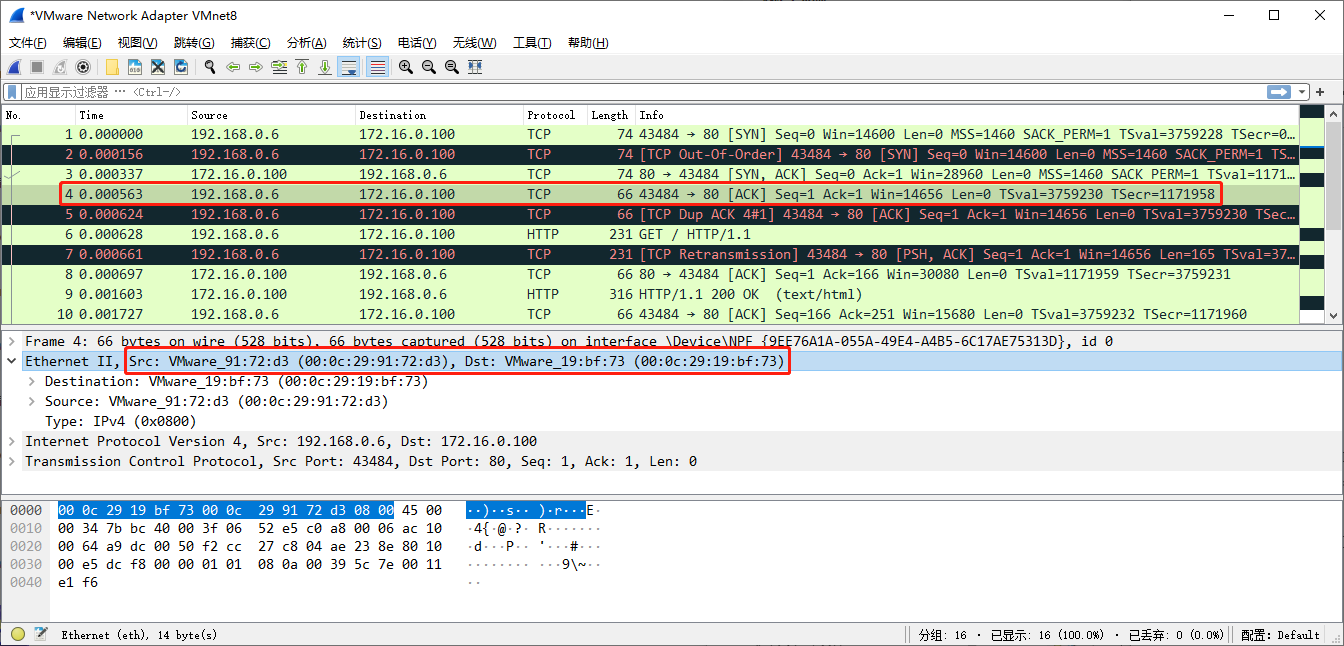
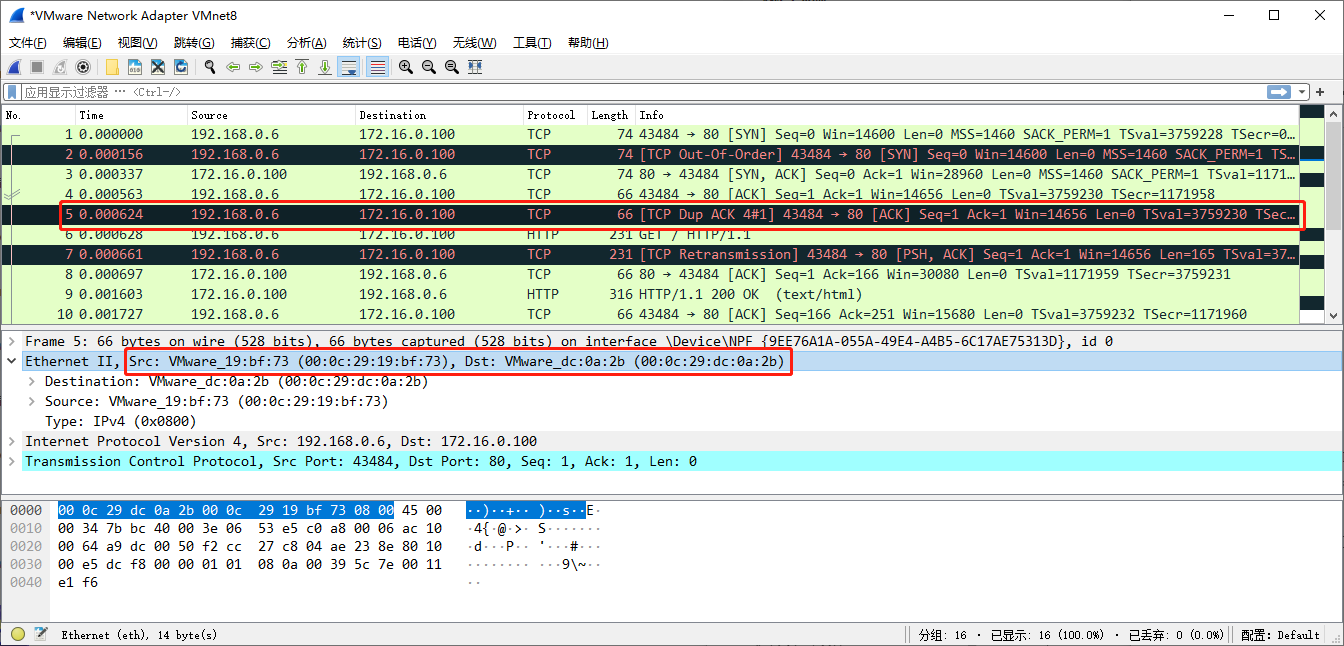
查看各主机eth0的MAC地址
[root@Router ~]# ifconfig eth0|grep ether|awk '{print $2}'
00:0c:29:91:72:d3
[root@LVS ~]# ifconfig eth0|grep ether|awk '{print $2}'
00:0c:29:19:bf:73
[root@rs1 ~]# ifconfig eth0|grep ether|awk '{print $2}'
00:0c:29:dc:0a:2b第一次握手:两个包
第1个包:Router-eht0-mac-->LVS-eht0-mac
第2个包:LVS-eth0-mac-->RS1-eth0-mac
第二次握手:一个包
第3个包:RS1-eth0-mac-->Router-eht0-mac
第三次握手:两个包
第4个包:Router-eht0-mac-->LVS-eht0-mac
第5个包:LVS-eht0-mac-->RS1-eth0-mac
2.4.2 分析LVS网关的作用
# 删除网关
[root@LVS ~]# ip route
default via 10.0.0.200 dev eth0 proto static metric 100
10.0.0.0/24 dev eth0 proto kernel scope link src 10.0.0.8 metric 100
[root@LVS ~]# ip route del default via 10.0.0.200 dev eth0
[root@LVS ~]# ip route
10.0.0.0/24 dev eth0 proto kernel scope link src 10.0.0.8 metric 100
[root@LVS ~]#

# 删除网关后立即不能访问
[root@Client ~]# curl 172.16.0.100
curl: (7) couldn't connect to host
[root@Client ~]#

# 随便添加一个网关
[root@LVS ~]# ip route add default via 10.0.0.66 dev eth0
[root@LVS ~]# ip route
default via 10.0.0.66 dev eth0
10.0.0.0/24 dev eth0 proto kernel scope link src 10.0.0.8 metric 100
[root@LVS ~]#

# 再次测试立马正常访问
[root@Client ~]# curl 172.16.0.100
10.0.0.17
[root@Client ~]# curl 172.16.0.100
10.0.0.7
[root@Client ~]#
由此可以看出访问后端服务器跟LVS网关是哪个并没有直接关系,但不配置网关却不能访问后端服务器。生产上需要正确配置网关,如果RS1和RS2机器宕机,需要给客户端返回机器正在维护的信息,此时LVS成为sorry server,如果需要lvs做sorry server必须配置正确网关。
Comments | 2 条评论
很棒啊!非常详细!非常非常棒!
@brick