









1 系统安装过程
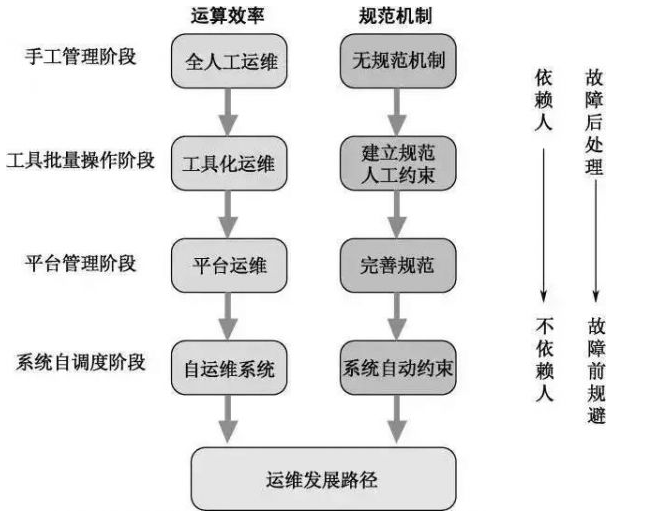
1.1 运维自动化发展历程及技术应用
1.2 系统安装过程
Linux的安装过程如下:
- 加载boot loader
- 加载启动安装菜单
- 加载内核和initrd文件
- 加载根系统
- 运行anaconda的安装向导
1.2.1 Linux安装光盘的安装相关文件
在系统光盘的ioslinux目录下有和安装相关的文件
- boot.cat:相当于grub的第一阶段
- isolinux.bin:光盘引导程序,在mkisofs的选项中需要明确给出文件路径,这个文件属于syslinux项目
- isolinux.cfg:启动菜单的配置文件,当光盘启动后(即运行isolinux.bin),会自动去找isolinux.cfg文件
- vesamenu.c32:是光盘启动后的启动菜单图形界面,也属于syslinux项目,menu.c32提供纯文本的菜单
- memtest:内存检测程序
- splash.png:光盘启动菜单界面的背景图
- vmlinuz:是内核映像
- initrd.img:ramfs文件
1.2.2 安装菜单的内核参数
安装光盘的启动菜单配置文件:isolinux/isolinux.cfg中设置相关的内核加载参数,实现不同的安装过程
isolinux.cfg文件中的每个安装对应菜单选项:
- 加载内核:isolinuz/vmlinuz
- 向内核传递参数:append initrd=initrd.img参数设置
指定内核参数方法
- 在启动菜单界面,选中一项安装方法,按tab键,在后面增加参数
- 在启动菜单界面,任意选中一项安装方法,按ESC键:boot:linux 参数设置
常见的内核参数:
-
text:默认启动GUI安装接口,可以指定文件方式的安装界面
-
rescue:进入救援模式
-
init.repo=path:指定安装源文件的路径,可以是以下格式
Centos6
DVD drive repo=cdrom:device
Hard Drive repo=hs:device/path
HTTP Server repo=http://host/path
HTTPS Server repo=https://host/path
FTP Server repo=ftp://username:password@host/path
NFS Server repo=nfs:server:/path
ISO images on an NFS Server repo=nfsiso:server:/pathCentso7
Any CD/DVD drive inst.repo=cdrom
Hard Drive inst.repo=hd:device:/path
HTTP Server inst.repo=http://host/path
HTTPS Server inst.repo=https://host/path
FTP Server inst.repo=ftp://username:password@host/path
NFS Server inst.repo=nfs:[options:]server:/path -
askmethod:选择安装源文件的获取方法,提供了光盘,本地硬盘,NFS,FTP,HTTP多宗安装源,此项Centos7以后版本已经废弃
-
ks=path:指定自动化安装应答文件路径,如:initrd=initrd.img inst.ks=http://10.0.0.8/ksdir/ks.cfg
-
ip=:指定IP信息
ip=method,method可以为dncp
ip=initerface:method 指定特定接口
ip=ip::gateway:netmask:hostname:interface:none 静态IP1.2.3 anaconda安装向导
anaconda时linux系统安装程序,可以提供两种风格的安装界面
- gui:图形安装
- tui:基于图形库curses的文本窗口
anaconda工作过程
-
安装过程使用的语言
-
键盘类型
-
时区和时间
-
安装源文件
-
选定要安装的程序包
-
安装目标存储设备及分区设置
Basic Storage:本地磁盘
特殊设备:iSCSI
-
KDUMP功能
-
设置主机名和配置网络接口
-
安全策略
-
管理员密码
-
创建一个普通用户
anaconda的配置方式:
-
交互式配置方式
-
通过读取事先给定的配置文件自动完成配置,加载内核参数:ks=/path事先指明kickstart文件的位置,各种路径格式如下:
DVD drive:ks=cdrom:/PATH/TO/KICKSTART_FILE
Hard Drive:ks=hd:device:/directory/KICKSTART_FILE
HTTP Server:ks=http://host:port/path/to/KICKSTART_FILE
FTP Server:ks=ftp://host:port/path/to/KICKSTART_FILE
HTTPS Servet:ks=https://host:port/path/to/KICKSTART_FILE
NFS Server:ks=nfs:host:/path/to/KICKSTART_FILE
2 自动安装的应答文件
事先自动安装前,需要制作对应的安装应答文件,称为kickstart文件,用于保存安装过程需要指定的选项。
2.1 kickstart文件使用过程
- Create a Kickstart file.
- Make the Kickstart file available on removable media, a hard drive or a network location.
- Create boot media, which will be used to begin the installation.
- Make the installation source availabel.
- Start the Kickstart installation.
2.2 kickstart文件的格式
2.2.1 Kickstart文件格式官方说明
2.2.2 kickstart文件格式说明
kickstart文件主要包括三个部分:命令段,程序包段,脚本段
- 命令段:指明各种安装前配置,如键盘类型等
命令段中的常见命令:
keyboard:设定键盘类型
lang:语言类型
zerombr:清除mbr
clearpart:清除分区
part:创建分区
rootpw:指明root的密码
timezone:时区
text:文本安装界面
network:指定网络设置
firewall:设置防火墙设置
selinux:设置selinux设置
reboot:安装完自动重启
user:安装完成后为系统创建新用户
url:指明安装源 - 程序包段:指明要安装的程序包组或程序包,不安装的程序包等
%packages
@^environment group:指定环境包组,如:@^minimal-environment
@group_name
package
-package
%end - 脚本段:
%pre:安装前脚本
%opost:安装后脚本
注意:
- CentOS 8,7,6不同版本的kickstart文件格式不尽相同,不可混用
- %addon, %packages, %onerror, %pre,%post必须以%end结束,否则安装失败
Centos8的最小化安装kickstart文件
[root@cnetos8 ~]# cat anaconda-ks.cfg
#version=RHEL8
ignoredisk --only-use=nvme0n1
autopart --type=lvm
# Partition clearing information
clearpart --none --initlabel
# Use graphical install
graphical
# Use CDROM installation media
cdrom
# Keyboard layouts
keyboard --vckeymap=us --xlayouts='us'
# System language
lang en_US.UTF-8

# Network information
network  --bootproto=dhcp --device=ens160 --ipv6=auto --activate
network  --hostname=centos8
repo --name="AppStream" --baseurl=file:///run/install/repo/AppStream
# Root password
rootpw --iscrypted $6$H5kANbH7m4qxYOz6$EWFnwcHDYENjYeVx0wdd.nJsRCbhslLD0MjpgLIMOEctDL5pU2xevfJdOe.fmCsvKF9yw3zCkQ9xsL5bHjFOc0
# Run the Setup Agent on first boot
firstboot --enable
# Do not configure the X Window System
skipx
# System services
services --disabled="chronyd"
# System timezone
timezone Asia/Shanghai --isUtc --nontp
user --name=test --password=$6$tYLGNQ0cWJ.mMHh7$GiqnoND4nS83gTX7zjlJFaqwc5AAUEJnaLgo5Zo0NY1kOjamtnRJIaO.w6/1Yficy7cZOKPmjM5OkO2h0mgQy0 --iscrypted --gecos="test"

%packages
@^minimal-environment

%end

%addon com_redhat_kdump --disable --reserve-mb='auto'

%end

%anaconda
pwpolicy root --minlen=6 --minquality=1 --notstrict --nochanges --notempty
pwpolicy user --minlen=6 --minquality=1 --notstrict --nochanges --emptyok
pwpolicy luks --minlen=6 --minquality=1 --notstrict --nochanges --notempty
%end
2.2.2.1 自定义Centos8的最小化安装的kickstart文件
ignoredisk --only-use=sda
zerombr
text
reboot
clearpart --all --initlabel
selinux --disabled
firewall --disabled
url --url=http://10.0.0.8/centos/8/os/x86_64/
keyboard --vckeymap=us --xlayouts='us'
lang en_US.UTF-8

bootloader --append="net.ifnames=0" --location=mbr --boot-drive=sda # 此行必须指定
network  --bootproto=dhcp --device=eth0 --ipv6=auto --activate
network  --hostname=centos8.waluna.top

rootpw --iscrypted $6$H5kANbH7m4qxYOz6$EWFnwcHDYENjYeVx0wdd.nJsRCbhslLD0MjpgLIMOEctDL5pU2xevfJdOe.fmCsvKF9yw3zCkQ9xsL5bHjFOc0
firstboot --enable
skipx
services --disabled="chronyd"
timezone Asia/Shanghai --isUtc --nontp
user --name=test --password=$6$tYLGNQ0cWJ.mMHh7$GiqnoND4nS83gTX7zjlJFaqwc5AAUEJnaLgo5Zo0NY1kOjamtnRJIaO.w6/1Yficy7cZOKPmjM5OkO2h0mgQy0 --iscrypted --gecos="test"

#autopart --type=lvm
#part / --fstype xfs --size 1 --grow --ondisk sda 可以实现根自动使用所有剩余空间
part / --fstype="xfs" --ondisk=sda --size=10240
part /data --fstype="xfs" --ondisk=sda --size=51200
part swap --fstype="swap" --ondisk=sda --size=2048
part /boot --fstype="ext4" --ondisk=sda --size=1024

%packages
@^minimal-environment
%end

%addon com_redhat_kdump --disable --reserve-mb='auto'
%end

%anaconda
pwpolicy root --minlen=6 --minquality=1 --notstrict --nochanges --notempty
pwpolicy user --minlen=6 --minquality=1 --notstrict --nochanges --emptyok
pwpolicy luks --minlen=6 --minquality=1 --notstrict --nochanges --notempty
%end

%post
useradd luna
echo 777 | passwd --stdin luna &> /dev/null
%end
2.2.2.2 自定义Centos7的最小化安装的kickstart文件
install
xconfig  --startxonboot
url --url=http://10.0.0.8/centos/7/os/x86_64
text
selinux --disabled
firewall --disabled
reboot
skipx
bootloader --append="crashkernel=auto net.ifnames=0" --location=mbr --boot-drive=sda
auth --enableshadow --passalgo=sha512
firstboot --enable
ignoredisk --only-use=sda
keyboard --vckeymap=us --xlayouts='us'
lang en_US.UTF-8
network  --bootproto=dhcp --device=eth0 --ipv6=auto --activate
network  --hostname=centos7.waluna.top
rootpw --iscrypted $6$WzWjxGL3pJcVafy/$aSDEYnb85qO/OQo.Dhrb5XV/OPCKyfjQ7P0UwV8UB57/xlZWVXc.REYphGZ60Hzv3EzpGLr3hCsAwt3hGVvis/
services --disabled="chronyd"
timezone Asia/Shanghai --isUtc --nontp
user --name=test --password=$6$S2EW9S86gHWeo6H0$vHSJepuJleua5bD9015UbnEGIdjWbOefypYcJMInfdU5Er/8sIt5bY8F0jyKGAxTGRaLrQ4U.r5n0VQwrQ6o10 --iscrypted --gecos="test"
zerombr
clearpart --all --initlabel
part swap --fstype=swap --ondisk=sda --size=2048
part / --fstype=xfs --ondisk=sda --size=51200
part /boot --fstype=xfs --ondisk=sda --size=1024
part /data --fstype=xfs --ondisk=sda --size=30720

%packages
@^minimal
vim-enhanced
wget
curl
tree
%end

%post
mkdir /etc/yum.repos.d/backup
mv /etc/yum.repos.d/*.repo /etc/yum.repos.d/backup
cat > /etc/yum.repos.d/cnetos7.repo <<EOF
[base]
name=CentOS
baseurl=file:///misc/cd
        https://mirrors.aliyun.com/centos/\$releasever/os/\$basearch/
gpgcheck=0

[extras]
name=Extras
baseurl=https://mirrors.aliyun.com/centos/\$releasever/extras/\$basearch
gpgcheck=0
enabled=1

[extras]
name=Extras
baseurl=http://mirrors.aliyun.com/epel/\$releasever/\$basearch
gpgcheck=0
enabled=1
EOF

useradd luna
echo 777 | passwd --stdin luna &> /dev/null
%end
2.2.2.3 自定义Centos6的最小化安装的kickstart文件
install
text
reboot
url --url=http://10.0.0.8/centos/6/os/x86_64/
lang en_US.UTF-8
keyboard us
network --onboot yes --device eth0 --bootproto dhcp --noipv6
rootpw  --iscrypted $6$3vwINCjY$.9DalzTcWTcLIPgdjVLEs39WyE5plsKGCTMBGuoF.9xzIkheH.XXZvCSrL
sWVYbRN4joIQ6ifNf/OBVprmajC1
firewall --disabled
authconfig --enableshadow --passalgo=sha512
selinux --disabled
timezone Asia/Shanghai
bootloader --location=mbr --driveorder=sda --append="crashkernel=auto rhgb quiet"
zerombr
clearpart --all --initlabel
part /boot --fstype=ext4 --size=1024
part / --fstype=ext4 --size=50000
part /data --fstype=ext4 --size=30000
part swap --size=2048

%packages
@core
@server-policy
@workstation-policy
autofs
vim-enhanced
%end

%post
useradd luna
echo 777|passwd --stdin luna &> /dev/null

mkdir /etc/yum.repos.d/backup
mv /etc/yum.repos.d/* /etc/yum.repos.d/backup
cat > /etc/yum.repos.d/centos6.repo <<EOF
[base]
name=CentOS-$releasever - Base - mirrors.tuna.tsinghua.edu.cn
failovermethod=priority
baseurl=file:///misc/cd
        http://mirrors.tuna.tsinghua.edu.cn/centos-vault/6.10/os/\$basearch/
gpgcheck=0

[updates]
name=CentOS-$releasever - Updates - mirrors.tuna.tsinghua.edu.cn
failovermethod=priority
baseurl=http://mirrors.tuna.tsinghua.edu.cn/centos-vault/6.10/updates/\$basearch/
gpgcheck=0

[extras]
name=CentOS-$releasever - Extras - mirrors.tuna.tsinghua.edu.cn
failovermethod=priority
baseurl=http://mirrors.tuna.tsinghua.edu.cn/centos-vault/6.10/extras/\$basearch/
gpgcheck=0
EOF
%end
2.3 kickstart文件创建
常见kickstart文件的方式
- 可使用创建工具:system-config-kickstart,注意:此方法centos8不再支持
- 依据某模板修改并生成配置,centos安装完后,会自动参考当前系统的安装过程,生成一个kickstart文件/root/anaconda-ks.cfg
检查ks文件的语法错误:
使用ksvalidator工具可以检查kickstart的文件格式是否有语法错误,来自于pykickstart包
格式:
ksvalidator /PATH/TO/KICKSTART_FILE
Comments | NOTHING