









1.4.4.8 高可用 master 初始化
首先基于 keepalived 实现高可用 VIP,然后实现三台 k8s master 基于 VIP 实现高可用。
1.4.4.8.1 基于命令初始化高可用 master 方式
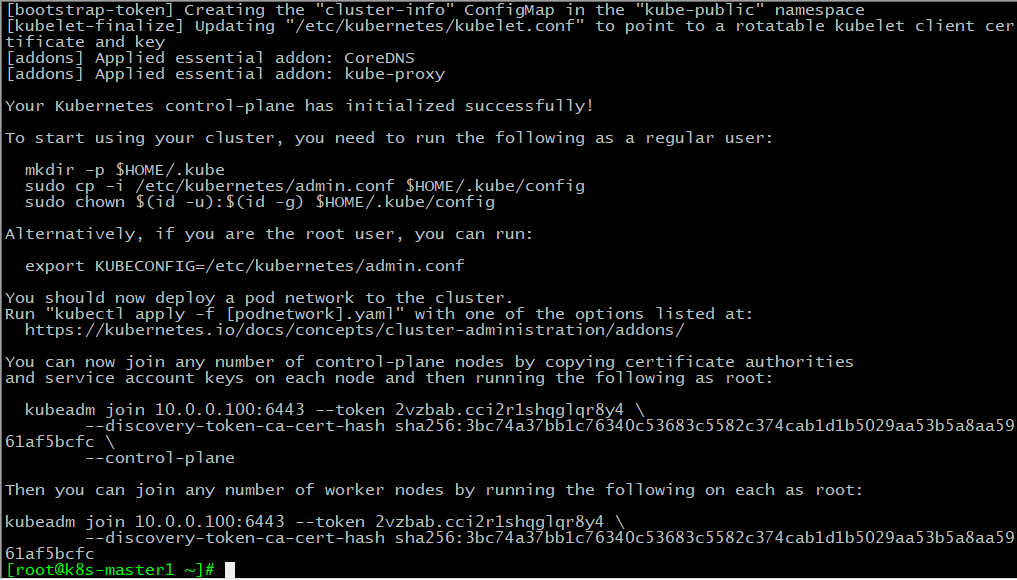
在三台 master 中任意一台 master 进行集群初始化 ,而且集群初始化只需要初始化一次。
[root@k8s-master1 ~]# kubeadm init --apiserver-advertise-address=10.0.0.9 --apiserver-bind-port=6443 --control-plane-endpoint=10.0.0.100 --ignore-preflight-errors=swap --image-repository=registry.cn-hangzhou.aliyuncs.com/google_containers --kubernetes-version=v1.21.1 --pod-network-cidr=10.10.0.0/16 --service-cidr=10.20.0.0/16 --service-dns-domain=waluna.local成功结果如下
1.4.4.8.2 kubeadm reset 使用
使用 kubeadm init 初始化的信息可以使用 kubeadm reset 还原掉,最好还原机器,否则会有影响,比如iptables不会清空,导致coredns报错,http 503.
reset后会有提示
重置过程不会清除 CNI 配置。 为此,您必须删除 /etc/cni/net.d
重置过程不会重置或清理 iptables 规则或 IPVS 表。
如果您想重置 iptables,您必须使用“iptables”命令手动执行此操作。
如果您的集群设置为使用 IPVS,请运行 ipvsadm --clear (或类似的)重置系统的 IPVS 表。
重置过程不会清理您的 kubeconfig 文件,您必须手动删除它们。
请检查 $HOME/.kube/config 文件的内容。
[root@k8s-master1 ~]# kubeadm reset
[reset] Reading configuration from the cluster...
[reset] FYI: You can look at this config file with 'kubectl -n kube-system get cm kubeadm-config -o yaml'
[reset] WARNING: Changes made to this host by 'kubeadm init' or 'kubeadm join' will be reverted.
[reset] Are you sure you want to proceed? [y/N]: y  # 输入y确认
[preflight] Running pre-flight checks
[reset] Removing info for node "k8s-master1.waluna.top" from the ConfigMap "kubeadm-config" in the "kube-system" Namespace
[reset] Stopping the kubelet service
[reset] Unmounting mounted directories in "/var/lib/kubelet"
[reset] Deleting contents of config directories: [/etc/kubernetes/manifests /etc/kubernetes/pki]
[reset] Deleting files: [/etc/kubernetes/admin.conf /etc/kubernetes/kubelet.conf /etc/kubernetes/bootstrap-kubelet.conf /etc/kubernetes/controller-manager.conf /etc/kubernetes/scheduler.conf]
[reset] Deleting contents of stateful directories: [/var/lib/etcd /var/lib/kubelet /var/lib/dockershim /var/run/kubernetes /var/lib/cni]

The reset process does not clean CNI configuration. To do so, you must remove /etc/cni/net.d

The reset process does not reset or clean up iptables rules or IPVS tables.
If you wish to reset iptables, you must do so manually by using the "iptables" command.

If your cluster was setup to utilize IPVS, run ipvsadm --clear (or similar)
to reset your system's IPVS tables.

The reset process does not clean your kubeconfig files and you must remove them manually.
Please, check the contents of the $HOME/.kube/config file.
[root@k8s-master1 ~]#
1.4.4.8.3 基于文件初始化高可用 master 方式
基于文件初始化
# 输出默认初始配置
[root@k8s-master1 ~]# kubeadm config print init-defaults

# 将默认配置输出至文件
[root@k8s-master1 ~]# kubeadm config print init-defaults > kubeadm-init.yaml

# 修改初始化文件内容
[root@k8s-master1 ~]# vim kubeadm-init.yaml
[root@k8s-master1 ~]# cat kubeadm-init.yaml
apiVersion: kubeadm.k8s.io/v1beta2
bootstrapTokens:
- groups:
  - system:bootstrappers:kubeadm:default-node-token
  token: abcdef.0123456789abcdef
  #ttl: 24h0m0s
  ttl: 48h0m0s  # 修改token有效期
  usages:
  - signing
  - authentication
kind: InitConfiguration
localAPIEndpoint:
  #advertiseAddress: 1.2.3.4
  advertiseAddress: 10.0.0.9    # 监听地址改为本地IP
  bindPort: 6443
nodeRegistration:
  criSocket: /var/run/dockershim.sock
  #name: node
  name: k8s-master1.waluna.top  # 名称改为本机主机名
  taints: null
---
apiServer:
  timeoutForControlPlane: 4m0s
apiVersion: kubeadm.k8s.io/v1beta2
certificatesDir: /etc/kubernetes/pki
clusterName: kubernetes
controlPlaneEndpoint: 10.0.0.100:6443   # 添加此行,填写集群VIP
controllerManager: {}
dns:
  type: CoreDNS
etcd:
  local:
    dataDir: /var/lib/etcd
imageRepository: k8s.gcr.io
#imageRepository: registry.cn-hangzhou.aliyuncs.com/google_containers   # 修改镜像仓库地址,因前面使用打标签方式,所以这里可以不用更改
kind: ClusterConfiguration
#kubernetesVersion: 1.21.0
kubernetesVersion: 1.21.1   # 修改想要装的k8s版本
networking:
  #dnsDomain: cluster.local
  dnsDomain: waluna.local   # 更改dns域名
  podSubnet: 10.10.0.0/16   # 添加此行,设置pod网段
  #serviceSubnet: 10.96.0.0/12
  serviceSubnet: 10.20.0.0/16   # 修改service网段
scheduler: {}
[root@k8s-master1 ~]#

# 初始化
[root@k8s-master1 ~]# kubeadm init --config kubeadm-init.yaml
[init] Using Kubernetes version: v1.21.1
[preflight] Running pre-flight checks
        [WARNING IsDockerSystemdCheck]: detected "cgroupfs" as the Docker cgroup driver. The recommended driver is "systemd". Please follow the guide at https://kubernetes.io/docs/setup/cri/
[preflight] Pulling images required for setting up a Kubernetes cluster
[preflight] This might take a minute or two, depending on the speed of your internet connection
[preflight] You can also perform this action in beforehand using 'kubeadm config images pull'
[certs] Using certificateDir folder "/etc/kubernetes/pki"
[certs] Generating "ca" certificate and key
[certs] Generating "apiserver" certificate and key
[certs] apiserver serving cert is signed for DNS names [k8s-master1.waluna.top kubernetes kubernetes.default kubernetes.default.svc kubernetes.default.svc.waluna.local] and IPs [10.20.0.1 10.0.0.9 10.0.0.100]
[certs] Generating "apiserver-kubelet-client" certificate and key
[certs] Generating "front-proxy-ca" certificate and key
[certs] Generating "front-proxy-client" certificate and key
[certs] Generating "etcd/ca" certificate and key
[certs] Generating "etcd/server" certificate and key
[certs] etcd/server serving cert is signed for DNS names [k8s-master1.waluna.top localhost] and IPs [10.0.0.9 127.0.0.1 ::1]
[certs] Generating "etcd/peer" certificate and key
[certs] etcd/peer serving cert is signed for DNS names [k8s-master1.waluna.top localhost] and IPs [10.0.0.9 127.0.0.1 ::1]
[certs] Generating "etcd/healthcheck-client" certificate and key
[certs] Generating "apiserver-etcd-client" certificate and key
[certs] Generating "sa" key and public key
[kubeconfig] Using kubeconfig folder "/etc/kubernetes"
[kubeconfig] Writing "admin.conf" kubeconfig file
[kubeconfig] Writing "kubelet.conf" kubeconfig file
[kubeconfig] Writing "controller-manager.conf" kubeconfig file
[kubeconfig] Writing "scheduler.conf" kubeconfig file
[kubelet-start] Writing kubelet environment file with flags to file "/var/lib/kubelet/kubeadm-flags.env"
[kubelet-start] Writing kubelet configuration to file "/var/lib/kubelet/config.yaml"
[kubelet-start] Starting the kubelet
[control-plane] Using manifest folder "/etc/kubernetes/manifests"
[control-plane] Creating static Pod manifest for "kube-apiserver"
[control-plane] Creating static Pod manifest for "kube-controller-manager"
[control-plane] Creating static Pod manifest for "kube-scheduler"
[etcd] Creating static Pod manifest for local etcd in "/etc/kubernetes/manifests"
[wait-control-plane] Waiting for the kubelet to boot up the control plane as static Pods from directory "/etc/kubernetes/manifests". This can take up to 4m0s
[apiclient] All control plane components are healthy after 17.535562 seconds
[upload-config] Storing the configuration used in ConfigMap "kubeadm-config" in the "kube-system" Namespace
[kubelet] Creating a ConfigMap "kubelet-config-1.21" in namespace kube-system with the configuration for the kubelets in the cluster
[upload-certs] Skipping phase. Please see --upload-certs
[mark-control-plane] Marking the node k8s-master1.waluna.top as control-plane by adding the labels: [node-role.kubernetes.io/master(deprecated) node-role.kubernetes.io/control-plane node.kubernetes.io/exclude-from-external-load-balancers]
[mark-control-plane] Marking the node k8s-master1.waluna.top as control-plane by adding the taints [node-role.kubernetes.io/master:NoSchedule]
[bootstrap-token] Using token: abcdef.0123456789abcdef
[bootstrap-token] Configuring bootstrap tokens, cluster-info ConfigMap, RBAC Roles
[bootstrap-token] configured RBAC rules to allow Node Bootstrap tokens to get nodes
[bootstrap-token] configured RBAC rules to allow Node Bootstrap tokens to post CSRs in order for nodes to get long term certificate credentials
[bootstrap-token] configured RBAC rules to allow the csrapprover controller automatically approve CSRs from a Node Bootstrap Token
[bootstrap-token] configured RBAC rules to allow certificate rotation for all node client certificates in the cluster
[bootstrap-token] Creating the "cluster-info" ConfigMap in the "kube-public" namespace
[kubelet-finalize] Updating "/etc/kubernetes/kubelet.conf" to point to a rotatable kubelet client certificate and key
[addons] Applied essential addon: CoreDNS
[addons] Applied essential addon: kube-proxy

Your Kubernetes control-plane has initialized successfully!

To start using your cluster, you need to run the following as a regular user:

  mkdir -p $HOME/.kube
  sudo cp -i /etc/kubernetes/admin.conf $HOME/.kube/config
  sudo chown $(id -u):$(id -g) $HOME/.kube/config

Alternatively, if you are the root user, you can run:

  export KUBECONFIG=/etc/kubernetes/admin.conf

You should now deploy a pod network to the cluster.
Run "kubectl apply -f [podnetwork].yaml" with one of the options listed at:
  https://kubernetes.io/docs/concepts/cluster-administration/addons/

You can now join any number of control-plane nodes by copying certificate authorities
and service account keys on each node and then running the following as root:

  kubeadm join 10.0.0.100:6443 --token abcdef.0123456789abcdef \
        --discovery-token-ca-cert-hash sha256:3a83a61437d3deb9fa80a5b5c9e1f50973833ce68f412814600f49ef7ce9919f \
        --control-plane

Then you can join any number of worker nodes by running the following on each as root:

kubeadm join 10.0.0.100:6443 --token abcdef.0123456789abcdef \
        --discovery-token-ca-cert-hash sha256:3a83a61437d3deb9fa80a5b5c9e1f50973833ce68f412814600f49ef7ce9919f
[root@k8s-master1 ~]#
初始化成功
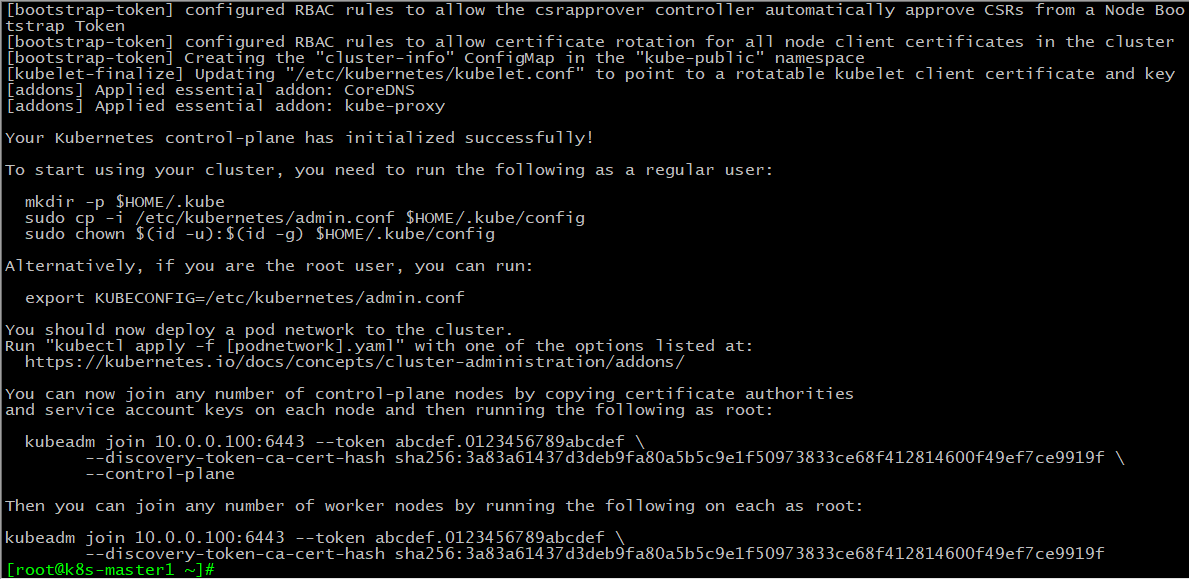
初始化成功后的信息为:
- 给用户授予权限
- 安装网络组件
- 使用root权限添加 master 节点
- 使用root权限添加node节点
Comments | NOTHING